|
Getting your Trinity Audio player ready...
|
In this article, we are going to discuss how to failover and failback SRDF based Production Disaster Recovery Based Servers .
Either in case of any emergency like hardware failures or any unwanted incident in one of the data centers or even scheduled failover and failback as part of organizational DR strategy.
Failover and Failback are just reverse activities. So whatever activities are performed in failover in failback steps will be just in reverse order.
If you are not sure about SRDF you can refer to my previous post about what is srdf replication?. To understand SRDF and how it works.
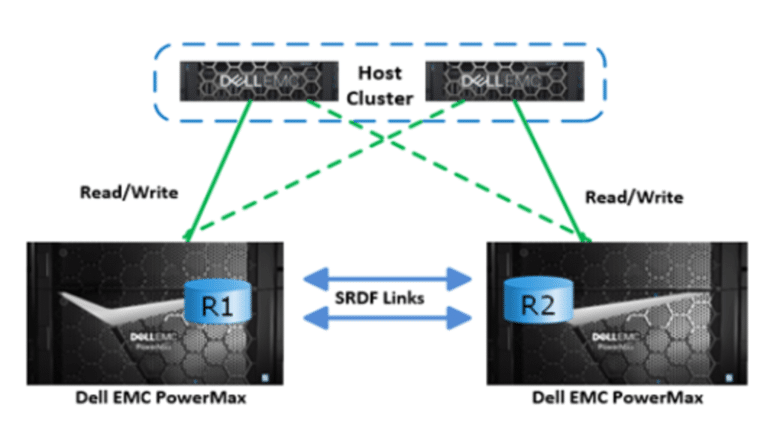
I will share here briefly. SRDF is basically what you can understand as disaster recovery solutions for critical applications from Dell (formerly EMC).
You will learn a lot during this srdf replication step by step guide. You will have the opportunity to learn srdf replication commands.
In this replica of hardware configuration with storage in two data centers and storage is mapped one to one and data get a sync.
There are basically two types of replication synchronous and asynchronous. These are expansive solutions and require reliable network bandwidth. Many organizations use synchronous mode only.
Only one side is always active in RW mode but data gets sync with a fraction of seconds to DR so in the event of any disaster you can split the relationship and make another side active and continue from another side.
In this example, Veritas is used for volume management but you can use it on LVM as well. Concepts will be the same.
So let’s start exploring how to failover and failback SRDF. The steps involved in this procedure will be like below. High-level steps will be like below.
- Check Replication Group Status
- DNS Alias Flip
- Activities On Current Production Server
1. Deactivate NFS Shares
2. Unmount All SRDF Related File Systems
3. Comment File System Table
4. Stop All Volumes
5. Deport The Disk Group
Table of Contents
Activities On Disaster Recovery Server
1. Enable Devices Control
2. Uncomment File System Table
3. Do SRDF Failover
4. Import Disk Groups
5. Start All Volumes
6. Mount All File Systems
7. Handover Server To DB/Apps Team to Start & Validate
8. Swap The Personalities
9. Resume Replication from New Production
So let`s start exploring these in detail to understand the complete step-by-step procedure for how to failover and failback SRDF.
Check Replication Group Status
Like other volume managers either LVM or VxVM volume groups or Disk Groups we create for managing them efficiently so as from the storage side. Replication groups are simply gets created to manage replicated devices efficiently.
It is always recommended as best practices to follow some basic naming convention to easily understand from the storage side as well as from the server-side as well.
Checking Replication Group Status is mandatory to make sure data is already in sync before failover starts to avoid any data or transaction loss in failover resulting business escalations and may lead to dispute and organizational image damage in case of critical business applications.
One side is always in RW mode you can say in general RW side is always Production and another side is the DR side.
If you already know the replication group name then it is fine otherwise you can check it using the below command.
# symdg list |grep SMT
A_SRVWP65_SMT_19    RDF2     NN  000297801643    21     0      0     0
Once you have the storage group name you can check using the below command and make sure it is in a consistent state.
#symrdf -g <symdgname> -consistent verify
If you find SYMDG is not in a consistent state or disabled. You can run below
#symcfg -g <SYMDG> enable
So now you have verified SYMDG group consistency you are good to go.
DNS Alias Flip
Most of the production servers use an alias for application management. For example, if you are failing over from Server A to Server B. All resources like alias must point to your new production server as you will flip all replicated file systems to server B.
It depends upon your firm configuration SA may or may not be having access to do this or maybe the network team in your firm has to do this as part of their responsibility.
That really does not matter who is doing but all alias must be moved to new prod server B if you are failing over them completely.
In case if many critical applications running on the same server you can failover them individually as well.
Deactivate NFS Shares
If Server A is an NFS master server and these replicated file systems are shared you need to unshare them before doing real failover. In Solaris unshareall and in linux you can use exportfs –u.
Unmount All SRDF Related File Systems
As I mentioned earlier smart naming convention is really helpful. Please see the example both on Solaris and Linux how a good naming convention can help in this kind of setup.
Solaris
# cat /etc/vfstab |grep srdf
/dev/vx/dsk/srdf_abcprd_t1-dg/data /dev/vx/rdsk/srdf_abcprd_t1-dg/data    /usr/data     vxfs    2       yes  -
/dev/vx/dsk/srdf_abcprd_t1-dg/home /dev/vx/rdsk/srdf_abcprd_t1-dg/home /usr/home     vxfs    2       yes  -
/dev/vx/dsk/srdf_abcprd_t1-dg/var /dev/vx/rdsk/srdf_abcprd_t1-dg/var    /usr/var         vxfs    2       yes -
RHEL
#cat /etc/fstab |grep srdf
/dev/vx/dsk/srdfa_smt_data-dg/temp      /usr/temp/smt     vxfs    _netdev         2 4
/dev/vx/dsk/srdfa_smt_data-dg/data      /usr/data/smt     vxfs    _netdev         2 4
/dev/vx/dsk/srdfa_smt_data-dg/log       /usr/log/smt      vxfs    _netdev         2 4
You can unmount all replicated file systems either using umount command or umount –l or umount -f. Normally avoid –l lazy unmount command as it may leave volumes still active which may not allow deactivating volume resulting you cannot deport disk group or volume group. fuser –u <filesyetm> can help in troubleshooting in case of any issue.
You can validate mounts using df –h to see no replicated file system is still mounted. Once we unmount all the replicated file systems you can proceed to stop all the volumes.
Stop All Volumes
Now you can stop all volumes in the disk group or volume group using the below command.
# vxvol -g <osdiskgroupname> stopall
# vgchange –an <osvgname>
Deport the Disk Group
#vxdg deport <dgname>
#vgexport <vgname>
Validate using below
#vxdisk –eo alldgs list |grep <DG>
Here you can see disk group must show [dgname] it means it is in the deported state. You can use it below as well.
#vxdg list |grep <DG>
It will not reflect any disk group name if it is already deported. That`s it you have to do on your current Production server which is expected to be failed over.
We’ll move to the current disaster recovery server which is going to be production after this activity.
On Disaster Recovery Server
Enable/Activate Devices
You can do that using below anyone depending upon the volume manager you are using.
# vxdctl enable
# pvscan/vgscan
Uncomment File System Table
Remember fs table must be having all replicated file systems in fstab or vfstab you just need to uncomment those as this is just a replica of production servers.
Do SRDF Actual Failover
At this step, we are going to do real failover. Here R1 becomes R2 and vice versa.
#symrdf -g <SYMDG> failover -force -noprompt
#symrdf -g <SYMDG> disable
Now devices are failed over. It means the DR side now has rw permission on devices and for time being one to one relationship has been broken. They work like standalone as of now.
Import Disk Groups
Import the disk group using the force option and clear the import tag.
#vxdg -fC import <DG>
#vgchange –ay <VGNAME>
#vgimport <VGNAME>
Now you can proceed with mount options.
Start All Volumes
This may or may not be optional. If the previous step importing makes them active.
Mount All SRDF File System
Mount all file systems either you can manually mount them or u can use mountall or mount –a command at once. Maybe fsck automatically runs and makes sure it is clean and gets mounted.
That`s it now we have all replicated file systems mounted on your DR and it is production now and as per previous steps, we have already flipped aliases. Now you are ready to hand over the server for database startup and application start and validation.
Do not forget to enable NFS Share if it has using shareall or exportfs -a depending upon which operating system you are performing failover.
Handover Server To DB/Apps Team
It is clear in itself let the database team starts the database. They will start the database and inform the application team to start the application and validate each and everything as per server designed role. Once you have confirmation you have to proceed with the next step.
Swap The Personalities
What is this? As mentioned earlier R1 becomes R2 and R2 becomes R1 due to failover activity perform. For example, RAM was primary after failover SHYAM become primary. So we have to swap their personality because now we need to sync data from SHYAM to RAM earlier than it was RAM to SHYAM.
You can achieve this by below a set of commands.
#symrdf -g <SYMDG> swap -noprompt
#symrdf -g <SYMDG> enable -noprompt
Resume Replication [Reverse Order]
Now failed over the site is primary. Data sync needs to resume from current production.
#symrdf -g <SYMDG> establish –noprompt
It may take time sometimes it totally depends after making an alternative site as primary and how much time taken in starting database and application and validating each and everything and amount of data written.
How To Monitor Replication State
You can monitor replication state as well as ETA you can use the below command which will refresh the state after every 5 seconds.
#symrdf -g <SYMDG> query -i 5
How to Change Replication Mode From ASYNC To ADAPTIVE COPY
If required you can easily change the mode of replication from ASYNC to ADAPTIVE COPY for faster data sync anytime in any case for such kind of replicated SRDF devices. You can use the below command for changing replication mode from async to adaptive copy.
#symrdf -g <SYMDG> set mode acp_disk -noprompt
After all, once you have replication in complete sync and inconsistent state you can revert back adaptive copy mode to async mode.
#symrdf -g <SYMDG> set mode ASYNC
Conclusion
That`s all about how to failover and failback SRDF. We have covered the complete procedure and seen many operations we can perform on replicated devices as administrators. In this post, you can refer to many srdf replication commands. These are the most preferred Disaster Recovery Solutions in Enterprise Sector.
EMC is the leader in this technology matter of price is simply like the same car comes at different prices and all have their own drawbacks and qualities.
If you like our posts request you to share as much as you can and allow this to reach the intended audience. You can also subscribe to our blog to get immediate notifications for such quality-level technical documents to be successful in extending your understanding and delivering quality work to your client.
You can reach us socially as below. We have given our blog name nixDrafts.You can google and hope you will definitely find us. Just for convenience sharing few links to how you can connect with us socially. We need support and waiting for a pushup from your side. If you want this step-by-step guide on how to failover and failback srdf you can write to us.
Facebook Page Our Facebook Group Our Linkedin Group
Other Articles May Be Of Your Interest