|
Getting your Trinity Audio player ready...
|
In last decade Cloud Technology came into limelight. As all know Amazon Web Services popularly known as AWS still leading the race of Cloud Technology but two other major player Google and Microsoft is continuously on growth track and keep increasing their market share in cloud technology industry.
Microsoft due to their global reach due to their many other desktop and server environment operating systems like Windows taking many steps to retain their existing client into Cloud Technology areas as well.
Microsoft with their cloud services offerings in brand name azure grasping their feet with good speed and have many enterprise clients in their bad. Azure is leading especially in enterprise sector.
All enterprise clients are in the process of migrating their physical and virtual environment to decommission their datacenters to save some cost.
Are you also planning to migrate your virtual machine from VMware to Azure. We will share tried and tested procedure which might be helpful in your journey from VMware to Azure.
Table of Contents
How to Migrate from VMware to Azure
All work needs proper planning before execution so as migration to Azure from VMware. You can categorize them in three major steps.
- Pre-steps before Migration to Azure from VMware
- Migration to Azure from VMware
Post Step after Migration to Azure from VMware
Pre-steps before Migration to Azure from VMware
Let us see what all things we need to make sure our migration success rate is high and have seamless experience.
Step 1
Make sure /boot partition must must have more than 60-70 MB plus. If it is not there you can remove some old kernel images and ensure it must have 60-70 MB available space in /boot file system which contains kernel related images.
Step 2
Download the lis-rpms Packages from Microsoft .
Step 3
Extract the download tar ball .
# tar xvzf lis-rpms-4.3.4.x86_64.tar.gz
Step 4
Install lis-rmps package
When you extract it in step 3 it gets extracted in present working directory under LISISO directory. Change to the LISISO directory like below and run install script.
# cd LISISO
#./install.sh
Step 5
Reboot the VMware Virtual Machine using below.
# shutdown -r now
Step 6
Configure VMware Virtual Machine to be ready to Migrate to Azure
I) In Azure /dev/sdb is used for /mnt/resources. So if you have any /dev/sdb mount point please comment those. Once VM is migrated then you can change mount point and mount those file system. Or even you can change it to next letter to avoid any issues during migration.
II) edit /etc/sysconfig/network file and add below two lines in file.
NETWORKING=yes
HOSTNAME=<server-name>.localdomain
III) Replaced all contents of ifcfg-eth0 to make it compatible with DHCP.
DEVICE=eth0
ONBOOT=yes
BOOTPROTO=dhcp
TYPE=Ethernet
USERCTL=no
PEERDNS=yes
IPV6INIT=no
IV) Create Link like below
#ln -s /dev/null /etc/udev/rules.d/75-persistent-net-generator.rulesV) Remove Rules #rm -f /etc/udev/rules.d/70-persistent-net.rules
VI) Update grub.conf for bootable image and remove “rhgb quiet” and add “console=ttyS0 earlyprintk=ttyS0 rootdelay=300″ to the kernel parameters line in /etc/grub.conf. This is to make sure you can access console without issues.
VII) Make Network Server active across reboots.
# chkconfig network on
IX) Add ClientAliveInterval 180 to /etc/ssh/sshd_config file
X) Start the Virtual Machine Replication in Azure. Get help if needed to replicate onprem VM to Azure for Migration.
That`s it now your virtual machine is ready to migrate to azure from VMware.
Migration to Azure from VMware
As we have already managed for to get virtual machine replicated using mechanism in your environment.
Microsoft Azure Tool for Migrating VMware VM to Azure via Azure Migrate. Azure Migrate is the service offered by Azure for the purpose of migration to Azure.
Step1
Login to Microsoft Azure Portal
Step2
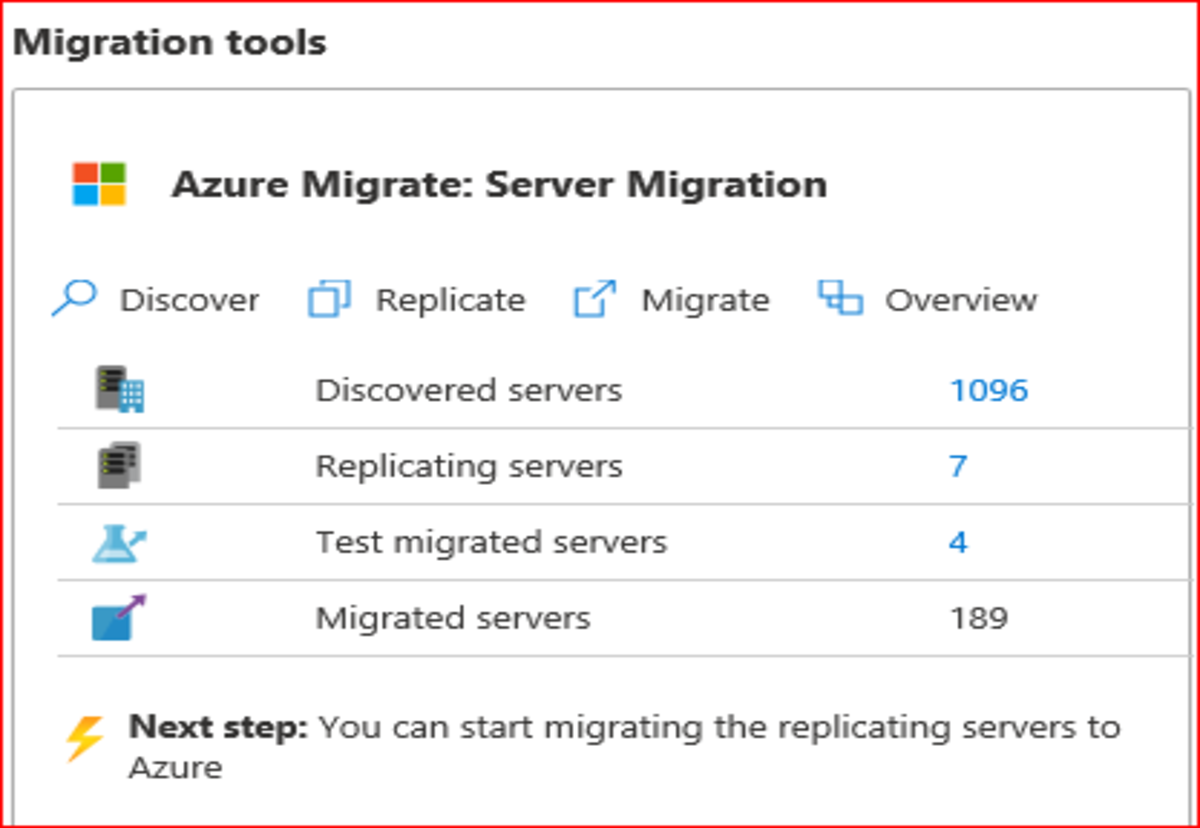
Search and Open Azure Migrate and then select Windows, Linux and SQL Server from left panel. In next screen please validate you have right project name is selected. You will get below screen which shows how many servers have been already replicated in Azure.
Step3
Click on Replicated Servers option and new dialog box will appear which will show that replication will show in healthy state.

Step4
Migrate the server either using three dots at the right most corner or by simply selecting your VM which you are migrating. New tasks gets created and you can see in notification in Azure Portal at right corner. If you expand the task it will look like below.
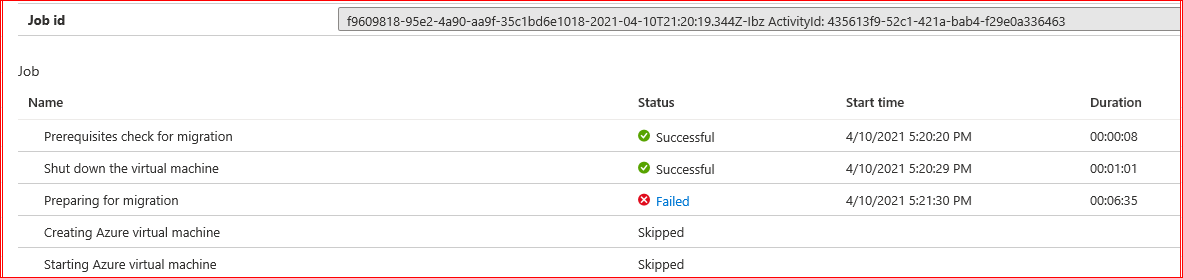
Do not worry with failed status. This is snap taken of failed attempt. Main objective to understand all all tasks is being performed when we start migration.IT validates prerequisite which we have already done.
Then it will shutdown VMware Machine itself. Next it prepares for migration once third stage is successful it will create a virtual machine based on VMware machine configuration and finally it will bring up Azure Virtual Machine online for you.
Well done !!!! Your machine is successfully Migrated to Azure from VMware. Have a cup of coffee and come back for Post Validations.
Post Step after Migration to Azure from VMware
Post Migration step is simply environment based. It will depends upon your environment. I will mention few points to consider.
1. Update /etc/resolv.conf .It may have your domain and one DNS Server may be from Azure and one you may have from On- Premise for proper DNS Services.
2. Install OMS Agent and enable it to be persistent like below
# systemctl enable waagent
3. Configure GRUB like below
# cat /etc/default/grub
GRUB_TIMEOUT=20
GRUB_DISTRIBUTOR="$(sed 's, release .*$,,g' /etc/system-release)"
GRUB_DEFAULT=saved
GRUB_DISABLE_SUBMENU=true
GRUB_TERMINAL_OUTPUT="console"
GRUB_CMDLINE_LINUX=" rootdelay=300 console=tty1 console=ttyS0
earlyprintk=ttyS0 crashkernel=auto rd.lvm.lv=rootvg/rootvol
rd.lvm.lv=rootvg/swapvol rhgb quiet"
GRUB_DISABLE_RECOVERY="true"
GRUB_TIMEOUT_STYLE=menu
GRUB_SERIAL_COMMAND="serial --speed=115200 --unit=0 --word=8 --parity=no --stop=1"
# grub2-mkconfig -o /etc/grub2.cfg
4. Remove VMWare Tools
# rpm -qa | grep -i open-vm
open-vm-tools-desktop-10.1.10-3.el7_5.1.x86_64
open-vm-tools-10.1.10-3.el7_5.1.x86_64
# rpm -ev open-vm-tools-desktop-10.1.10-3.el7_5.1.x86_64
Preparing packages...
open-vm-tools-desktop-10.1.10-3.el7_5.1.x86_64
# rpm -ev open-vm-tools-10.1.10-3.el7_5.1.x86_64
Preparing packages...
open-vm-tools-10.1.10-3.el7_5.1.x86_64
5. Take a final Reboot and you are done.
Conclusion
This is step by step guide on how to migrate to Azure from VMware. This procedure have been tested many times by us with our environment .Environment may differ so advise take a rough idea from this guide to perform migration in your environment not just simply copy and paste.
We will not be responsible for any damage happens which is not expected as maximum result your migration may fail but if you want foolproof plan just have snapshot of virtual machine in VMware before work. You will be able to easily revert back in case of failure.
This step by step guide share with sole purpose to make you understand the process of migration from VMware to Azure. I guess you will find it helpful. If you like our work. Please like and subscribe and share as much as you can to required audience and allow post to reach right audience.